Labels

Bread (7) Buns (1) Cheese (1) Christmas (7) Comfort (8) Cookies (7) Crock Pot (1) Dessert (13) Easy (13) Entrees (4) Fast (9) Fruit (7) Healthy (3) Italian (4) Muffins (4) Not-so-healthy (8) Pastry (2) Pub food (1) Pumpkin (2) Savoury (1) Scones (2) Slow Cooker (1) Soup (3)

Monday, June 24, 2013

Mac 'n' Cheese


A co-worker of mine gave me her mac and cheese recipe - hers has been the only homemade version that I have ever liked in my life. My rendition turned out pretty close to hers so I consider it a success.

Start by cooking your macaroni - I used half of a 900g package (only part of which is pictured below).  Salt it well. Shred a variety of cheese - probably about 2 cups (I used regular and sharp cheddars, while my co-worker used pepper jack and cheddar).  

In a 4-cup measuring cup, melt 1/4 cup butter or margarine and add 3-4 tsp of flour to make a thick slurry.  Add 1 1/4 cup of milk, and either cube 1 1/2 cups of Velveeta or add about 1 1.2 cups of cheese whiz. Melt the mixture in the microwave and stir every minute or so.  Add more cheese whiz or flour if it's too thin, or milk if it's too thick.  It should be just thin enough to pour onto the macaroni. 

Grease the casserole dish very well (Pam or margarine or whatever you prefer) and add half of the macaroni. Sprinkle half of the cheese on top, then layer with the next half of cooked macaroni. Pour the cheese whiz mixture over the entire dish evenly, then sprinkle the remaining cheese on top. Add salt and pepper and paprika for colour. 


Bake at 425 degrees for about 25 minutes - until the cheese on top is thickly crusted and nearly burnt.  Serve with more carbs if desired (I can't resist carbs so I paired it with cornbread).  Enjoy! 


Thursday, June 20, 2013

Cinnamon Snails


A friend gave me this recipe back when we were in high school and didn't really use the world wide web for much. I have no idea where it came from but had a craving the other day and asked my mother to search her house for it. It is quick and easy and they are tasty!

Dough:
  • 1.5 cups flour 
  • 1/4 cup sugar
  • 2 3/4 tsp baking powder
  • Dash of salt (approx 1/2 tsp)
  • 3/8 cup margarine
  • 1/2 cup milk with 1 egg beaten into it (only use about half in the dough)
Filling:
  • 3 Tbsp brown sugar
  • 1 tsp cinnamon

Mix the dry ingredients together. I melted the margarine and mixed it in, then added just enough of the milk/egg mixture to allow the dough to pull together into a mass that was able to be rolled with a rolling pin.  I used just under 1/2 of the mixture, and I ended up with some leftover milk/egg at the end of the recipe so you may wish to just mix the egg with 1/3 or 1/4 cup milk.

Roll the dough into a long rectangle, at least three times as long as it is wide.  I made mine about 18" x 6", and the swirls seemed too small at first but they puffed up while baking.


Spread some of the milk and egg mixture onto the dough and sprinkle liberally and evenly with the topping. Roll into a tight, long log (roll starting from the long side). Cut with a very sharp knife in approximately 3/4" widths. I found that my dough crumbled if I used the dough scraper or even dental floss - I used a filet knife to get a sharp cut. Bake at 350 degrees on parchment paper for about 14 minutes until they have risen and browned - they will harden a bit further after they are removed from the oven and they should be crumbly when eaten.

Enjoy!

Thursday, May 30, 2013

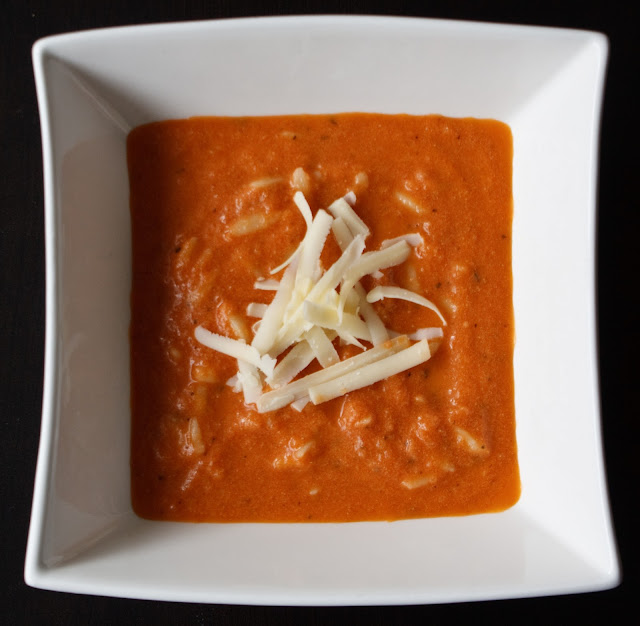
Three-Cheese Tomato Orzo Soup


Aside from the cheese, I consider this soup to be a healthy meal option. It's quite quick and easy to make (half hour if everything is available), and is a huge hit at my house.

Start with:

  • 1 diced yellow onion
  • 2-3 cloves minced garlic
  • 1 Tbsp olive oil
Heat the olive oil in a soup pot and brown the onions over medium heat - just a few minutes until they're tender and translucent.  Add the garlic and brown for another minute or two. 

Add (feel free to be flexible with amounts - this is just a guideline):
  • 2 (28 oz) cans of whole or diced tomatoes - I use whole and cut them up a bit. They seem a bit more flavourful than the diced ones. Add the liquid from the can also.
  • 2 cups chicken or vegetable broth
  • 1 cup plain Greek yogurt
  • 1/2 cup fresh basil if available, or a couple of teaspoons of dried basil
  • 2 tsp oregano
  • 1-2 tsp sugar, to taste (if I use more yogurt because it needs to be used up, another tsp of sugar or so is helpful)
  • Salt and pepper to taste
Simmer until well-heated throughout, then blend with an immersion/stick blender. Add cheese as desired - I used a sharp vintage white cheddar (love Tillamook cheese!), a bit of parmesan and some Friulano cheese, a staple of my Italian grandmother-in-law's kitchen.  Probably about 1.5 cups of grated cheese. Add pre-cooked orzo pasta to add some weight to the soup if desired - I love this.  Serve with basic buttered biscuits and enjoy! 


Saturday, April 06, 2013

Cheeze-its


Yum.  As claimed by the original poster, ShopGirlMaria, these do taste like the ones from the box, but you have the added bonus of knowing exactly what ingredients are involved.  I must re-post to ensure this recipe never disappears from my life.  The downside is that two pans of crackers does not last very long in my household.  We could eat salty cheesy snacks for hours.

Mix:
  • 1/4 cup butter or margarine, softened
  • 1/2 tsp salt
  • Approximately 1 cup of shredded sharp cheddar (I use a Tillamook Vintage Cheddar that is heavenly)

Add while mixing:
  • 1 cup flour
  • 3-4 Tbsp ice water (I used 4 and it was the right amount)

Pull the dough together, divide into two and chill for 30 minutes in the fridge in plastic wrap.  Then roll out on a floured surface to about 1/8" thick. Cut into squares with a fluted pastry cutter if you have one (I don't) and if you're not lazy, use a toothpick to prick each one. Spread on parchment paper, sprinkle with about another tsp of salt, and bake at 375 F for about 10 minutes.  They should be puffed and crisp. I found that it worked best to start them on parchment paper so they didn't stick to the pan, but then remove them for the last few minutes so they were more crispy than chewy.

Banana Muffins


These are handed down from my mom, and I have no idea what book she may have originally grabbed these from.  The trick to moist, yummy banana muffins is really old bananas.  I let mine get so brown that you can't see a single bit of yellow left on them, and then I freeze them if I'm not going to use them right away.  It's easy to pull them out of the freezer and let them sit in the sink to thaw for anytime-banana-muffins.

Mix together:

  • 3 overripe bananas
  • 3/4 cup white sugar
  • 1 egg
  • 1/3 cup veg. oil (ie. canola)
Separately, combine:
  • 1 1/2 cups flour
  • 1 tsp baking soda
  • 1 tsp baking powder
  • 1/2 tsp salt
  • chocolate chips as desired (I usually add a big handful, 1/2 cup or so)
Crumble topping (this is heavenly but I am usually too lazy):
  • 1/3 cup packed brown sugar
  • 2 Tbsp flour
  • 1/8 tsp cinnamon
  • 1 Tbsp butter (tip: freeze the butter and then you can grate it so it's easier to mix in)
Combine wet and dry ingredients and mix with a spatula until just moistened.  Spoon into a greased muffin tin.  Sprinkle the topping on each muffin and bake at 375 degrees F for 18-20 minutes, or until a toothpick comes out clean (if doing mini-muffins, I find about 15 minutes is enough).  Enjoy!

Sunday, March 17, 2013

Whole Wheat Buns


I have searched high and low for a light, fluffy, whole wheat-ish bun recipe. My previous attempts had always failed, giving me dense or small buns that tasted good but were a bit of a chore to eat.

No longer.

I found a recipe for light wheat rolls and it has worked for me on several occasions. This may be due to the high yeast content, but the reason really doesn't concern me. These are light and fluffy, and I can make large hamburger-sized buns or divide them into 32 small dinner rolls with a single batch.

Mix yeast into water and let stand for about 10 minutes:

  • 1 3/4 cup warm (yeast-friendly temperature) water 
  • 2 packages active dry yeast (1 package is about 2 1/4 tsp)
Mix separately:

  • 1/2 cup sugar
  • 1 tsp salt
  • 2 1/4 cups whole wheat flour
  • 1/4 cup melted butter or margarine
  • 1 beaten egg

Mix yeast and water into flour mixture and then add 2 1/2 cups all-purpose flour, 1/2 cup at a time.  Stir until dough pulls away from the sides of the bowl (I love my KitchenAid mixer for this).  Add more flour if necessary.  Then knead either in stand mixer or on well-floured surface until smooth and elastic - about 8 minutes. The dough should be sticky but not so much that it gets all over your hands - it should hold mostly together. 


Oil the bowl, turn the dough to coat, then cover with plastic wrap and let rise in a warm place until doubled.  At that point, punch it down and let it rise again.  If my kitchen is warm the first rise takes about 45 minutes and the second one only half an hour or so.

Turn out onto floured surface again, divide into about 16 large buns or 32 small ones (anything that's a multiple of 8 is easy to divide).  Roll into balls and place on a greased cookie sheet.  I choose to cover them with greased/oiled plastic wrap and let rise again in a warm place until buns have doubled in size.  They will look large and puffy and round.  I don't usually butter the tops of the buns but if you like the glossy look feel free to do that. Preheat the oven to 400 degrees. 

Bake for 11-15 minutes depending on the size.  Be careful not to have them too close to the top or bottom elements - I find the tops brown very quickly if I don't put them on the centre rack.  They should be golden brown when finished, and when you turn them over they should sound hollow when tapped on the bottom. Let them cool on a rack and enjoy!

Wednesday, February 20, 2013

Chocolate Chip Oatmeal Cookies


This has been my favourite cookie recipe since I was about six years old. These cookies are chewy and soft and yummy and almost healthy because of the oats. You can read my roommate's description of them here at Breakfast Monkey... just in case you don't believe me that they're yummy.  She totally did beg me to make these multiple times a month, whenever we were supposed to be studying.

Beat together:

  • 2 eggs
  • 1 cup margarine
  • 1 cup sugar (or slightly less, I tend to only fill my cup about 3/4 full)
  • 1 tsp vanilla

Add and mix well:

  • 2 cups flour
  • 1 tsp salt
  • 1 tsp baking soda

Add and hand-mix:

  • 2 cups rolled oats
  • 1-1.5 cups chocolate chips (I usually use 1 cup chocolate, half cup butterscotch or Reese's or white chocolate chips!)

Bake on an ungreased cookie sheet at 350 degrees for 10-12 minutes.  Do not let the cookies get brown!  They should come out soft and they will harden when they cool.  This gives them the chewy, melt-in-your mouth texture that is so desirable. 

Tuesday, February 12, 2013

Peanut Butter Cookies


These were always a favourite growing up. With milk. Or frozen as dough and scooped out piece-by-piece.  The baked cookies just melt in your mouth.

Cream together:

  • 1 cup margarine
  • 1 cup white sugar
  • 2 eggs
Add: 
  • 2 1/4 cups flour (don't underfill, or you'll end up with very sticky dough)
  • 1.5 tsp baking soda
  • 1 tsp salt
  • 1 cup peanut butter
Squish with a fork both ways to get the signature look. Bake at 350 degrees for about 12 minutes.  Try not to break them when removing them from the pan... but don't beat yourself up about it... it's all the same in the stomach.


Saturday, February 09, 2013

Pitas

Taken directly from Annie's Eats.  She has a whole-wheat version too, if I remember right, but so far I can't fathom making anything other than these.

These pitas are so easy if you're bumming around the house and can attend the dough occasionally.  Just like Annie said herself - you won't be able to eat store-bought pitas anymore.  Today my husband asked me to make them as a base for pizzas... and then we just ate them plain with Greek salad instead.


  • 3 cups flour, and a little more as needed
  • 1.5 tsp salt
  • 1 package instant yeast
  • 1 Tbsp sugar or honey in 1 cup warm water (not too hot!)

Mix the salt and flour together, and add the yeast to the cup of sweet water. Let it foam for 10 minutes if you're not sure if your yeast is still kicking, then add it to the flour mixture.  Mix together and knead for about 10 minutes (this is where I thank the Lord for the KitchenAid stand mixer).  Add a little flour if needed to get rid of the major sticky factor.  The dough should pull away from the sides and be tacky but you should be able to handle it decently without it getting all over your hands. 

Cover with plastic wrap and let the dough rise until doubled - probably about 1.5 hours.    

Divide risen dough into 8 portions, shape into balls and let them rest for 20 minutes or so - this will allow them to be pliable. 

Use a rolling pin on a floured surface to shape each ball into a disc, about half an inch thick.  They should be about the diameter of your finished pita.  Place them onto parchment paper or something else non-stick and let them rise, no cover needed, about half an hour.  In the meantime, preheat the oven to 450 degrees with a pizza stone inside. 

Once heated, place as many as you can fit (I usually get 4) into the oven for about 3 minutes. They will puff up and should be cooked through - but I usually flip them over for another minute or so just to get markings on both sides. They will still be good, I promise. If you want a very defined pocket inside, don't flip it over.

Enjoy fresh out of the oven with tzatziki sauce.  You will not regret it. 


Thursday, February 07, 2013

Gnocchi


I married an Italian... with many relatives that live nearby... and for that I am eternally thankful. Gnocchi are small light bites of pillowy goodness - potato dumplings loaded with cheese and spicy meat sauce. We bought the packaged ones from the store once, but they are nothing like Grandma's.  She, in her unique grumpy-grandma style, refused to teach us how to make it like she learned in Italy.  So, we decided to try it on our own and give her a run for her money. 

This is one of those "by feel" recipes that I normally avoid, but after several successful productions (with rave reviews from even the Italians) I am happy to say that we can add this to our cookbook. 
  • 3 large russet potatoes, boiled and peeled
  • 1 egg
  • a generous pinch of salt
  • flour as needed (probably up to 2 cups)

The most important step of the recipe is this: you must put the potatoes through a potato ricer.  When they're cool enough to handle and peel, take portions of the hot potatoes and squish them through.  This will make the finished gnocchi light and fluffy. 

Add the salt, egg, and mix briefly together. Add most of the flour and mix, again briefly.  Do not mix this dough for long - it should come together but not be completely homogeneous.  Add flour until the dough (still warm!) is pliable and doesn't completely stick to your hands. Essentially it has to be enough like a pasta dough that you can roll it out into long snakes. You want to add the minimum amount of flour necessary, as the finished product will be more dense if there is more flour in it. 


Cut the snakes into small pieces and squish halfway with a fork (I find the dough should be sticky enough that it would cling to the fork in an annoying way... so flour the fork to keep this from driving you crazy).  This creates grooves for the pasta sauce and cheese to cling to. Grandma is very good at quickly whipping them off the fork... we will need a lot more practice at this.


Prep a pot of boiling water, well salted, with a bit of oil to keep them from sticking. Cook them like pierogies - drop several into the water, remove right away once they float to the top (this will be 10-30 seconds or so).  Taste to confirm that the dumpling is light and cooked fully through.

Load with cheese - parmesan, friulano, romano - anything white and sharp and tasty.  Add your favourite sauce - we usually take something that's good from a jar or can and add sauteed onions, peppers, and pieces of Italian sausage from a local butcher.

Enjoy with a salad and ciabatta bread.